Monday, August 22, 2011

How to: Clean & Slice Mushroom

Picture by Liz Oxhorn 
I have not always been a fan of mushrooms...I think it's because we usually ate the canned white mushrooms growing up. Those things still gross me out on pizzas....But when I discovered that there's a world of fresh mushrooms, I became addicted! I particularly love baby bella mushrooms because they have the meaty texture of portobello mushrooms but are far easier to cook/clean!

So how do you clean mushrooms?  Well first, you can't rinse them in the sink.  If you've ever done this, you know that the mushrooms go soggy and fall apart, which is not appetizing! So instead take a damp cloth and gently rub the dirt off of the mushroom. You can then snap off the woody stem and toss those away.

Picture by Liz Oxhorn

What you are left with are beautiful, clean mushrooms.

Picture by Liz Oxhorn

You can easily stop at this point, stuff the mushrooms with a nice filling, and roast them. Or....

Picture by Liz Oxhorn

Slice them! Since there is no stem to make the mushroom unstable, you can easily place the mushroom cap on your cutting board and slice in any direction/thickness you like.

Picture by Liz Oxhorn

Now you're ready to add the mushrooms to a soup, sauce or casserole...or you can saute them in a little olive oil, garlic, & rosemary as an easy side dish.

Monday, August 15, 2011

Mexican Quinoa Salad


Before you skip this entry saying "Quinoa? What is that? That sounds weird....I'm not going to eat that." Let me tell about this awesome supergrain that I have become obsessed with. These little grains pack 4 times the amount of protein as rice (per serving) and have a great amount of fiber! Ok ok, who cares about the health benefits, right? Well, quinoa is great because it has a similar consistancy as short grain brown rice, cooks quickly, and absorbs the flavors of whatever you mix with it.  This flexibility makes it the perfect base for summer salads.

So when I started concocting this Mexican-inspired salad, I knew I wanted black beans, corn, tomatoes, cilantro, etc.  I was a little worried that all these individual components would add up and make the salad expensive. That's when I found that Trader Joe's makes a black bean & corn salsa! My love for this store continues to grow!

To bulk the salad up I added some steamed zucchini, but you can add anything you like! The last time I made this salad (no picture sadly) I also added steamed green beans and sliced avocado on top.  But feel free to add roasted chicken, an extra can of black beans, or whatever else you have in the house!

The greatest part about this salad is that it comes together in less than 15 minutes!

  1. Cook Quinoa.  The directions may vary on the box, but with the Trader Joe's brand, you mix 1 part quinoa to 2 parts water, bring to a boil, then simmer for 10-15 minutes, or until the water is gone.
  2. Chop and Steam Veggies. Depending on what veggies you choose, simply slice them all to a consistent size. Then, I put them in a Ziplock Zip-n-Steam bag and follow the directions on the bag. 
  3. Mix. In a medium bowl, add the following:
    • One container of black bean salsa 
    • the juice of half a lime 
    • Cooked quinoa (1/2 cup dry quinoa to 1 cup water) 
    • steamed veggies
    • Add salt and pepper to taste
That's it! You can eat it hot or cold; as a side dish or a light lunch.

Thursday, August 4, 2011

Vietnamese Cuisine in Toronto

Hello from beautiful Toronto, Canada!

I'm up here for my association's big annual meeting. That means lots of hotel food, stale coffee, and bad convention center vendors. So what do I do when I have an evening off? Grab some awesome local cuisine of course!

My hotel happens to be in the "old Chinatown" area, so around the corner is every type of Asian cuisine.  Yesterday I had some awesome Thai green curry (sorry, no pictures!) but tonight I had Vietnamese at Pho Orchid (124 Chestnut Street).


Now, I hate to say this, but I have not eaten a lot of Vietnamese food in my life.  From what I've tried, I know how light and refreshing the food can be. After receiving a glass of water with orange slices, I ordered the grilled beef & spring roll "bun" vermicelli bowl. Oh my, this was the perfect meal after all of the heavy food I have been eating. A warm, crunchy spring roll was served along side thinly sliced meat (that almost melted in my mouth), and placed atop a bed of vermicelli rice noodles, crisp lettuce, peanuts, and a small bowl of fish sauce. I loved that the meat actually tasted grilled and not like it was stir-fried in oil.  For a bit of extra flavor, fresh chopped mint was sprinkled on top which added a nice bright flavor to the dish.


The atmosphere of the restaurant was great too. Don't let the picture dissuade you (I happened to take the picture in between surges of customers) this place was both clean and classy. Usually with Asian restaurants you have to choose between clean/expensive or cheap/dirty, but how much was my awesome dinner with tax & tip? Ten dollars! Now granted, that's Canadian dollars, but the exchange rate isn't that big of a difference.

Monday, August 1, 2011

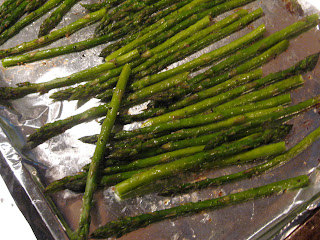
How to Roast Asparagus

I seriously LOVE asparagus! I know I say that with a lot of foods, but asparagus is one of those veggies I would eat pretty much every day if I could. One of my favorite ways to eat them is roasted with a little olive oil, salt, and pepper. For those of you who say you don't like asparagus, it is probably because of 1 of 2 reasons: 1) It was overcooked and mushy or 2) it wasn't prepped properly and had chewy, woody ends.

Well it is time to forget the asparagus of the past and to learn to make it properly! To start out, cover a baking sheet with a little aluminum foil (makes clean-up super easy) and preheat your oven to 400 degrees. Pick up a few pieces of asparagus and grip the stalks at either end. 


Bend the asparagus gently in the middle. The asparagus will naturally break where the woody part ends and the delicious stalk begins. Yes, this may mean you have some really short stalks (especially in the early and late parts of the season), but you don't want to eat that chewy part anyway, right?


Once you've separated all of the woody ends from the delicious end pieces, arrange the stalks on the baking sheet, drizzle with 1-1.5 tablespoons of olive oil (just eyeball it), and sprinkle salt/pepper on top. Toss gently with your hands to cover all of the asparagus with the seasoning and pop them into the oven.


The time it takes for the asparagus to roast is anywhere from 8-15 minutes depending on how crunchy you like your veggies. I like mine with a little give and a little crunch, so I roast mine for approximately 10 minutes. Ok, you know I'm not one for a timer, so lets be honest. I just fiddle with the asparagus at about the 8 minute mark, and if it bends slightly, I pretty much know it's finished.  Or you can always eat one to make sure it tastes good...or maybe just two...


See? Wasn't that simple?